This is the boys new favorite after school snack! I think I saw it on Pinterest at some point.
-Pillsbury crescent rolls
-Nutella
Unroll and separate dough as if you are going to make crescent rolls. Scoop 1-2 tablespoons of Nutella (or a little peanut butter too) at the large end of the crescent roll. Roll up as you would to make the rolls and bake according to the package directions. Serve with a big glass of milk.
I have pictures to upload, but I've run out of storage space on this blog and trying to figure out if I am willing to pay for extra storage.
Showing posts with label kid stuff. Show all posts
Showing posts with label kid stuff. Show all posts
Sunday, December 02, 2012

Saturday, January 14, 2012
Octopus Hotdogs
I'm not a fan of hotdogs, but had to give these a try for the kids (another Pinterest find). I save these kinds of things for when Scott is traveling for work and I want the boys to think I am super mom. Plus, they helped me make them and thought it was a blast.

Cut 5 hotdogs into 3 pieces each. Poke pieces of spaghetti through each piece of hotdog.

Cook hotdogs in boiling water for about 10 minutes or until warmed through. I let the kids eat with their hands and dip in ketchup. I wouldn't touch these things with a 10 foot pole but A & Z went ga ga for them!

Monday, August 22, 2011
BBQ Cups
I saw this recipe on Busy Kids = Happy Mom, a blog that I frequent. I'm always looking for something fun and easy to make with the kids so thought I'd give it a try. They had so much fun "helping" and thought the finished product was tasty. Seemed healthy enough for their growing bodies so we were all happy.
-1 pound ground beef (or turkey)
-2 Grands Flaky Biscuits (the kind you can pull apart)
-1/2 cup shredded cheese (cheddar or whatever you like)
-1/2 cup barbeque sauce (any flavor)

Brown ground beef and removed excess grease. Add the cheese and bbq sauce and mix together with the cooked meat. Lightly spray a muffin pan with Pam. Divide each biscuit in half (peel it in half where you see the division in the dough already) and shape inside of muffin pan. This takes a little stretching. Scoop the meat (about a heaping soup spoon full) filling into the biscuit. Bake according to biscuit directions (350 degrees for 14 -17 minutes). Makes about 24 "cups." The boys ate a few and then I froze the rest. I layed them out on a cookie sheet and put them in the freezer. After about an hour, I took them off the cookie sheet and put in a plastic bag for future use.
-1 pound ground beef (or turkey)
-2 Grands Flaky Biscuits (the kind you can pull apart)
-1/2 cup shredded cheese (cheddar or whatever you like)
-1/2 cup barbeque sauce (any flavor)

Brown ground beef and removed excess grease. Add the cheese and bbq sauce and mix together with the cooked meat. Lightly spray a muffin pan with Pam. Divide each biscuit in half (peel it in half where you see the division in the dough already) and shape inside of muffin pan. This takes a little stretching. Scoop the meat (about a heaping soup spoon full) filling into the biscuit. Bake according to biscuit directions (350 degrees for 14 -17 minutes). Makes about 24 "cups." The boys ate a few and then I froze the rest. I layed them out on a cookie sheet and put them in the freezer. After about an hour, I took them off the cookie sheet and put in a plastic bag for future use.
Sunday, May 08, 2011
Peanut Butter Playdough
We were introduced to peanut butter playdough at a friends house last weekend. The boys thought it was tons of fun to play with the dough and then lick their fingers (or even sneak a bite of the playdough). It wasn't as sticky as I was expecting it to be.

Mix ingredients in a bowl and you’re done! This is most easily accomplished with your hands. Store in an airtight container or plastic baggie with air sucked out of the bag. (Quick tip: Spray your 1/2 cup with oil before measuring your honey and the honey will pour much easier.)
From the kitchen of Megan Guttman.

-1 cup peanut butter
- 1/2 cup honey
- 2 cups powdered sugar
Mix ingredients in a bowl and you’re done! This is most easily accomplished with your hands. Store in an airtight container or plastic baggie with air sucked out of the bag. (Quick tip: Spray your 1/2 cup with oil before measuring your honey and the honey will pour much easier.)
From the kitchen of Megan Guttman.
Tuesday, February 15, 2011
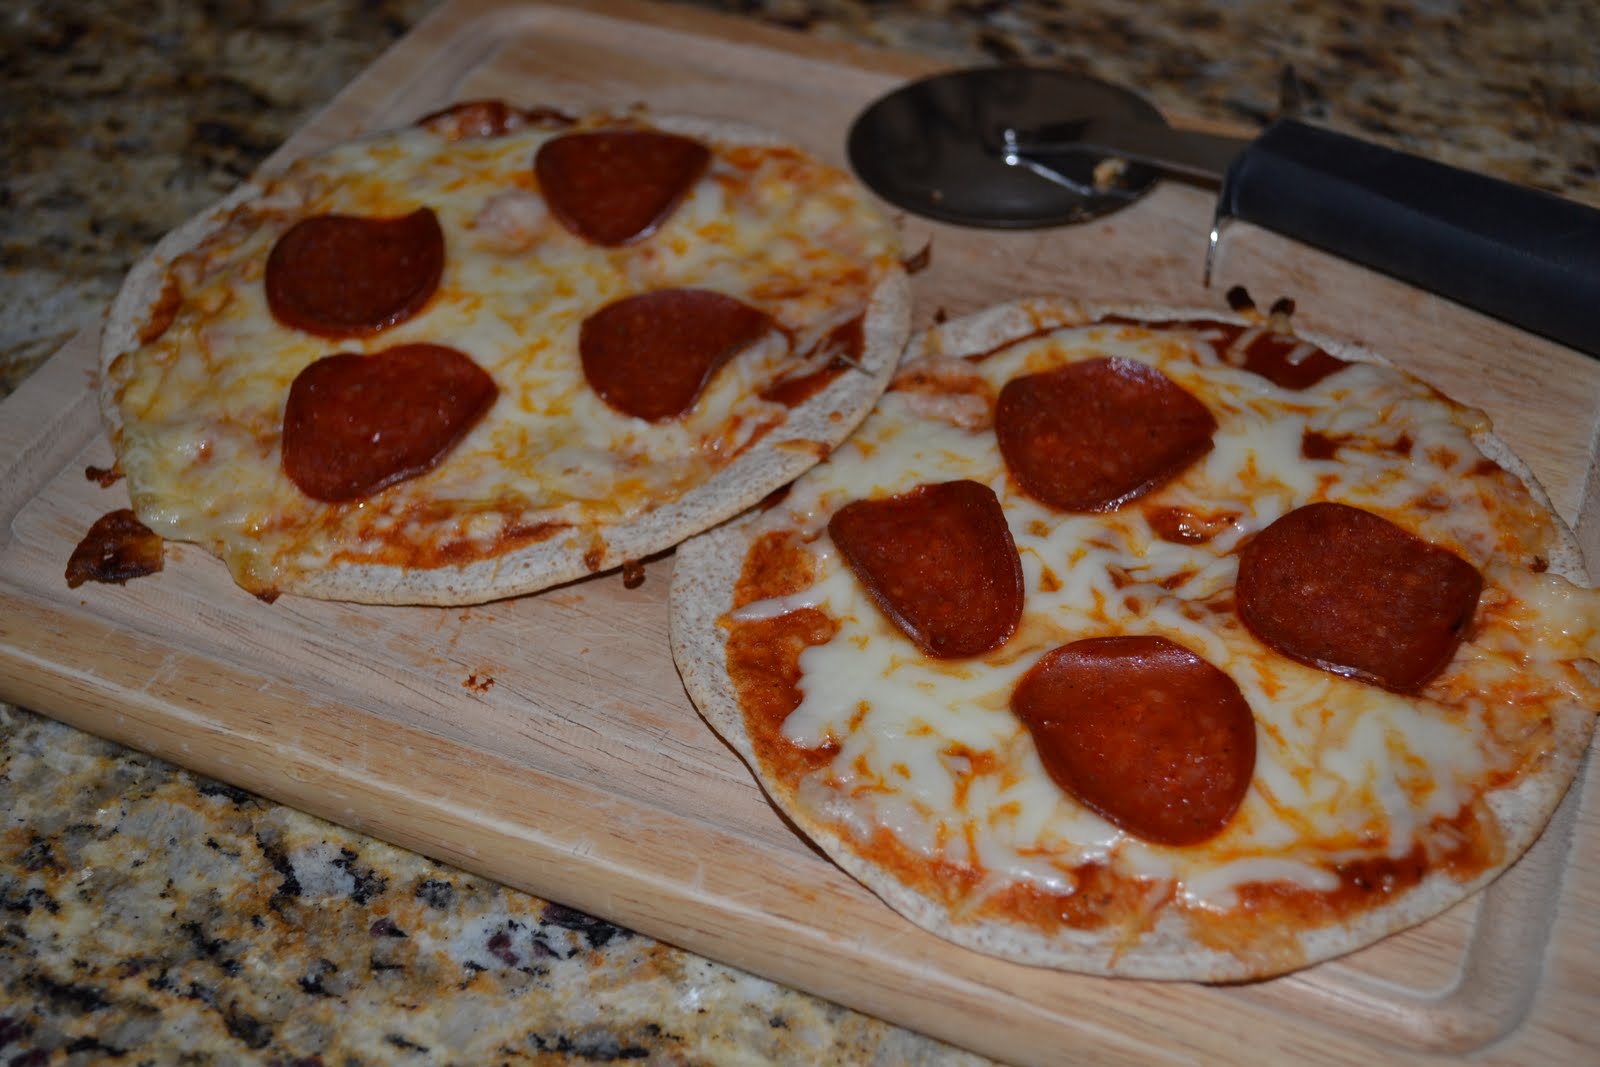
Tortilla Pizza
When Scott is working nights and I'm looking for something decently healthy to make for dinner without really cooking, this is one of my go to meals. It's so much healthier than throwing together mac and cheese or fish sticks and the boys love making their own personal pizza. Serve with some crunchy veggies on the side and your meal is complete.
-A few whole wheat tortillas (I use the fajita size)
-Pizza sauce
-Shredded mozzarella cheese or Italian cheese blend
-Turkey pepperoni
Lay a piece of foil on a baking sheet and spray with Pam. Lay a few tortillas out on the foil and let your kids spread on a tablespoon or two of pizza sauce on each one. Next, let the kiddos sprinkle on their cheese and pepperoni (I always pour a little cheese and pepperoni in a bowl to make it easier for them). Don't let them layer on too much cheese...the tortillas will get too soggy with too many toppings. Bake at 425 degrees for 8-10 minutes. You want to make sure the cheese is melted and that the tortillas are crisping up, but not burning. I let the personal pizzas cool for a few minutes on a cutting board before slicing them in 4's and serving them up. Hope your kids enjoy this cooking project as much as mine do. Mine always clean their plates if they've had help preparing the meal (even when it's not pizza!).

-A few whole wheat tortillas (I use the fajita size)
-Pizza sauce
-Shredded mozzarella cheese or Italian cheese blend
-Turkey pepperoni
Lay a piece of foil on a baking sheet and spray with Pam. Lay a few tortillas out on the foil and let your kids spread on a tablespoon or two of pizza sauce on each one. Next, let the kiddos sprinkle on their cheese and pepperoni (I always pour a little cheese and pepperoni in a bowl to make it easier for them). Don't let them layer on too much cheese...the tortillas will get too soggy with too many toppings. Bake at 425 degrees for 8-10 minutes. You want to make sure the cheese is melted and that the tortillas are crisping up, but not burning. I let the personal pizzas cool for a few minutes on a cutting board before slicing them in 4's and serving them up. Hope your kids enjoy this cooking project as much as mine do. Mine always clean their plates if they've had help preparing the meal (even when it's not pizza!).
Sunday, January 23, 2011
Breakfast Cookie
One of Scott's coworkers passed this recipe along to me. I tend to burn everything I bake, but thought I'd give them a try with Adam this week. They turned out great! Adam wasn't too keen on the taste, but he doesn't like "cookies" unless they have chocolate chips. Zach and I have been scarfing them down. I'm not sure I'd let the kids eat these for breakfast, but I don't feel guilty giving these to them (or myself) as a snack. I will admit that I HAVE eaten a few for breakfast this week! :)
-1/2 cup butter (I used margarine because I never have butter on hand)
-1/2 cup peanut butter (I used crunchy)
1/4 cup molasses
-3/4 cup honey
-1 tsp. vanilla
-2 large eggs
-1/2 cup all purpose flour
-1 tsp. baking soda
-1 cup whole wheat flour
-1/2 cup wheat germ
-3+ cups oats (I only had quick oats on hand and ended up using 3 cups exactly...didn't need to add any more)
-1/2 tsps salt
-1 tsp. cinnamon
-1 cup dried fruit bits (Adam selected dried blueberries, cranberries, and chopped dried apples to add in)
Cream together wet ingredients. Add dry ingredients and mix. You may need more than 3 cups of 0ats depending upon consistency. I only ended up using 3 cups. Use an ice cream scoop for large breakfast sized cookies. Flatten out cookies with your fingertips just a bit before putting them in oven. Bake @ 350 degrees for 10-12 minutes until light brown. Makes about 20 large cookies.

 As was suggested to me, after they were cool, we individually wrapped each cookie. This makes them easy to grab as a snack on the go and helps keep them moist.

-1/2 cup butter (I used margarine because I never have butter on hand)
-1/2 cup peanut butter (I used crunchy)
1/4 cup molasses
-3/4 cup honey
-1 tsp. vanilla
-2 large eggs
-1/2 cup all purpose flour
-1 tsp. baking soda
-1 cup whole wheat flour
-1/2 cup wheat germ
-3+ cups oats (I only had quick oats on hand and ended up using 3 cups exactly...didn't need to add any more)
-1/2 tsps salt
-1 tsp. cinnamon
-1 cup dried fruit bits (Adam selected dried blueberries, cranberries, and chopped dried apples to add in)
Cream together wet ingredients. Add dry ingredients and mix. You may need more than 3 cups of 0ats depending upon consistency. I only ended up using 3 cups. Use an ice cream scoop for large breakfast sized cookies. Flatten out cookies with your fingertips just a bit before putting them in oven. Bake @ 350 degrees for 10-12 minutes until light brown. Makes about 20 large cookies.
As was suggested to me, after they were cool, we individually wrapped each cookie. This makes them easy to grab as a snack on the go and helps keep them moist.
Wednesday, January 05, 2011
Kim's Smoothies
Scott and I were addicted to smoothies back in our pre-kid days. While on vacation last week, he had a craving for one and it's now become part of our everyday breakfast routine again. The kids are loving them and beg for one in the morning. They are so easy and healthy. Plus, the kids LOVE pushing the on and off buttons on the blender for me. They will eat anything that they had a hand in making.

I've never followed a recipe, but wrote down some estimated ingredients for Scott's sake the other day and thought I'd also share with you.

-2 bananas
-2 cups orange juice
-3/4-1 cup of yogurt (I use plain low-fat yogurt, but you could also use greek yogurt. In a pinch, any flavor yogurt will do...this morning I used vanilla because I ran out of plain)
-2 cups frozen fruit
-1-2 T wheat germ
-1-2 T honey

 Dump all your ingredients in a blender and blend until smooth. I always use frozen strawberries or blueberries, but I'm sure raspberries, peaches or other frozen fruit would work well too. You could also use fresh fruit but then would need to add some ice to your smoothie before blending. Makes about 4 cups.

I've never followed a recipe, but wrote down some estimated ingredients for Scott's sake the other day and thought I'd also share with you.

-2 bananas
-2 cups orange juice
-3/4-1 cup of yogurt (I use plain low-fat yogurt, but you could also use greek yogurt. In a pinch, any flavor yogurt will do...this morning I used vanilla because I ran out of plain)
-2 cups frozen fruit
-1-2 T wheat germ
-1-2 T honey


Monday, May 12, 2008
Playdough
We made playdough this morning so I thought I'd share the recipe. This is the same good ole recipe my mom used for me while I was growing up.
Mix together in a medium saucepan:
-1 cup salt
-2 cups flour
-4 T cream of tartar
Add:
-2 cup water
-2 T oil
-Food coloring of your choice
Stir to mix. Heat on medium stirring constantly until very thick. Knead until smooth.

Mix together in a medium saucepan:
-1 cup salt
-2 cups flour
-4 T cream of tartar
Add:
-2 cup water
-2 T oil
-Food coloring of your choice
Stir to mix. Heat on medium stirring constantly until very thick. Knead until smooth.
 |
| Mixture starts out really runny... |
 |
| ...but clumps up fast. Keep stirring! |
 |
| At this point, scrap the mixture all together and place it on your counter. |
 |
| Knead the "dough" until it is throughly combined. |

 |
| I separate the dough into 3 different balls so we can do a few different colors. |
 |
| Drip food coloring drops onto the ball and knead the dough until the color is consistent throughout. Make sure you do this on a cutting board or wax paper so you don't stain your countertop. |
Subscribe to:
Posts (Atom)